How to Use Claude Code for Klaviyo Campaign Strategy Briefs (Step-by-Step)
How to Use Claude Code for Klaviyo Campaign Strategy Briefs (Step-by-Step)
A practical guide for email marketers, lifecycle marketers, and agencies who want to use Claude Code + MCPs to speed up campaign strategy without sacrificing quality.
This is for email marketers, marketing ops leads, and agency strategists who are already using AI tools but want to go further — from "AI helps me write copy" to "AI writes and publishes the full brief directly into my project management tool."
Specifically, you'll get the most out of this if you:
Write campaign briefs for Klaviyo (or similar) email sends
Use ClickUp, Asana, or Notion to manage your marketing workflow
Are already comfortable with tools and want to level up your automation
Work with a team that needs consistent, well-structured briefs every send
This is not a beginner's guide to AI. This is a working system you can steal and adapt.
This is not Claude.ai (the browser tool). This system uses Claude Code, a command-line interface that runs on your computer and can connect directly to your tools. If you've only used Claude in the browser, this is a different setup.
This also requires MCP (Model Context Protocol) — the connection layer that lets Claude talk directly to ClickUp, Asana, Notion, or any other tool. Think of it as giving Claude hands inside your software.
You do not need to be a developer to set this up, but you do need to be comfortable following technical setup instructions.
Step 1: Install Claude Code
1. Go to [claude.ai/code](https://claude.ai/code) and download Claude Code for your OS
2. Follow the installation instructions
3. You'll need an Anthropic account — a Pro subscription works, Max is better for heavy use
Step 2: Connect Your MCP
MCP is what lets Claude publish directly into your tools instead of just generating text. You install it once and it runs in the background.
ClickUp
1. Open Claude Code settings → MCP
2. Search for the ClickUp MCP server
3. Add your ClickUp API key (found in ClickUp → Settings → Apps → API)
4. Test the connection by asking Claude: "What spaces do I have in ClickUp?"
Asana
1. Open Claude Code settings → MCP
2. Search for the Asana MCP server
3. Add your Asana Personal Access Token (found in Asana → My Profile Settings → Apps → Developer Apps)
4. Test by asking Claude: "What projects do I have in Asana?"
Notion
1. Open Claude Code settings → MCP
2. Search for the Notion MCP server
3. Create a Notion integration and share the relevant pages/databases with it
4. Add your integration token to Claude Code
5. Test by asking Claude: "What databases do I have access to in Notion?"
This is the part most people skip, and it's why most AI-generated marketing is generic. The system works because Claude has your brand loaded as context files before it writes a single word.
What Are MCP Context Files?
They're plain text (Markdown) files that live in a folder on your computer. When Claude Code runs, it reads these files and uses them as working memory. Your brand's voice, audience, offer rules, and segment names are all loaded before the agent starts.
No more pasting brand guidelines into every chat. No more re-explaining who your customer is. It's already there.
The 5 Files That Matter
voice-and-tone.md| Brand voice, tonal guardrails, approved claims, banned claimsaudience.md| Core customer profile, pain points, what works, what doesn'tproducts.md| Full product catalog, approved claims per product, format rulessegments.md| Exact segment names from Klaviyo (copy-paste the real names)offer-rules.md| Discount tiers, BOGO rules, code naming convention, stacking rules
Plus one configuration file:
[tool]-config.md| Where briefs get published, folder/doc IDs, naming conventions, what Claude can and cannot do
One Prompt to Create All Your Brand Files
Use this prompt in Claude Code to generate your brand files from existing documents:
“I want to create a set of brand context files for my campaign strategy agent. I'm going to paste in my existing brand guidelines, audience research, product catalog, and any segment or offer documentation I have.
Please create the following files from this material:
For each file, follow this structure: lead with the most actionable rules, flag anything that needs client confirmation with !, and include a "what doesn't work" section alongside the "what does work" so the agent knows what to avoid.
Here is my source material:
Paste or attach all documents you have on your voice and tone, audience, products, segmentation and offer rules.
⚠️Important: The more context you feed here the more calibrated and precise your strategy documents will be.
The brief template lives in your project management tool (ClickUp, Asana, or Notion). The agent reads it, duplicates it, and fills it in for each campaign.
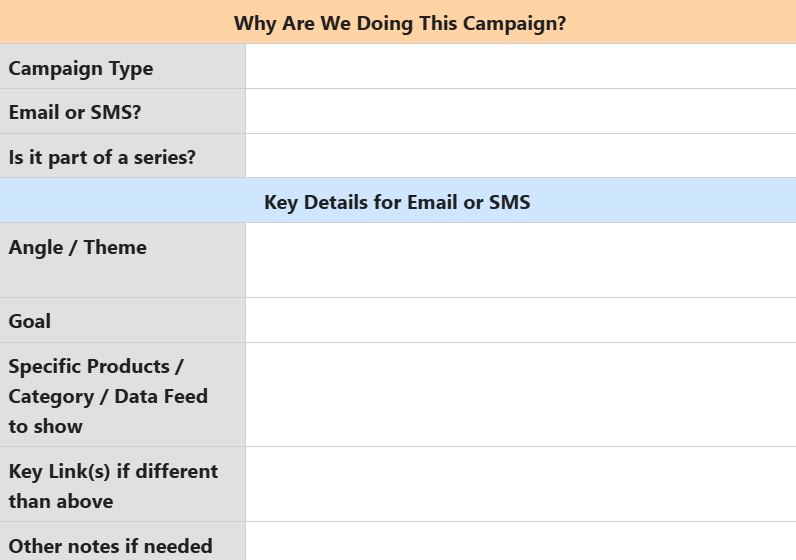
What makes a good brief template:
Structured sections the whole team already uses (Campaign Purpose, Email, SMS, Post Mortem)
Role-specific fields (Designer / Copywriter / Developer notes per section)
Subject and preview text fields
Audience include/exclude fields with segment name slots
Offer and discount code fields
Send date and UTM fields
Don’t Have One? Copy Our Template
Click to access!
The config file is what tells Claude where to publish, what naming conventions to use, and what it's allowed and not allowed to do. Every project gets its own config.
Here is the full config file used in this system:
Where briefs get published
- Space: [Your Space Name]
- Folder: [Your Folder Name]
- Template Doc: [Your Template Doc Name]
How the agent publishes a brief
Duplicate-then-fill. The ClickUp API cannot duplicate docs natively. The team duplicates the template in ClickUp first — this preserves all styling and structure. Claude then fills in the content.
Step-by-step
1. Team duplicates the template in ClickUp and renames it per convention below
2. Team shares the new doc URL or ID with Claude
3. Claude reads the blank pages via clickup_get_document_pages
4. Claude fills each page via clickup_update_document_page
5. Claude returns the URL of the completed doc
Do not create a new doc from scratch. Do not modify the original template.
If the user has not yet duplicated the template, stop and ask them to do so.
What the agent should NOT do
Modify the template doc under any circumstances
Delete existing docs
Modify docs created by other team members
Change folder structure or permissions
Create docs outside the designated folder
Bulk-create — one brief per request
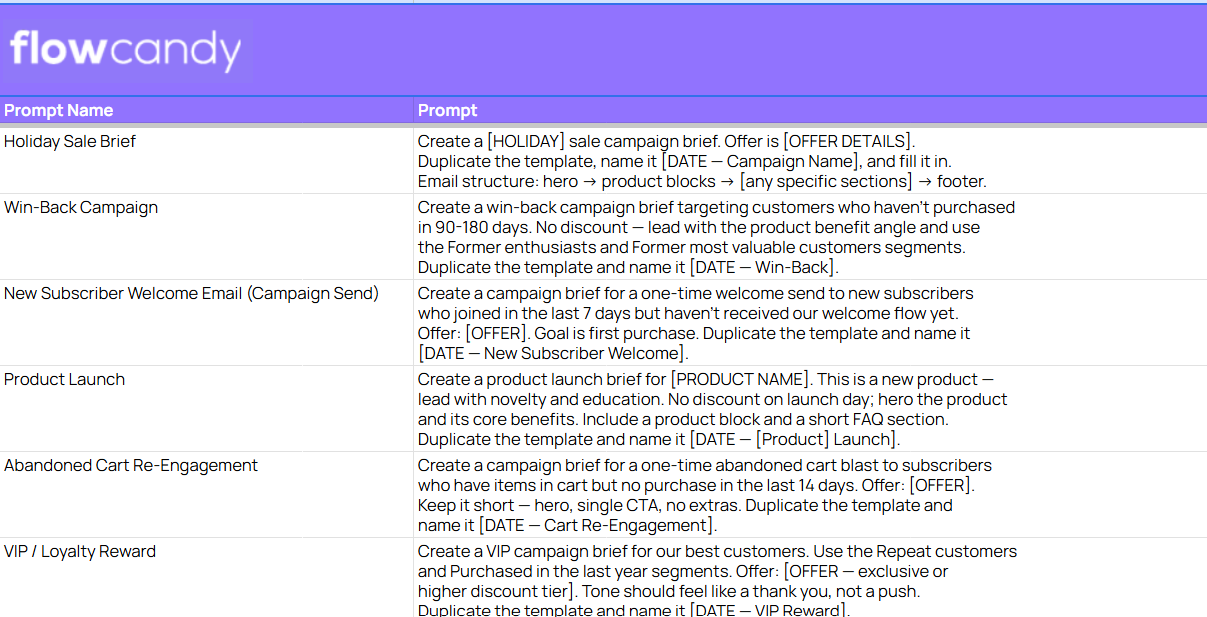
Prompts: How To Use Claude Code To Create Campaign Strategy Briefs In Minutes
Need Help Implementing This For Your Brand?
If you made it this far, you already know the problem isn't AI, it's the hour you spend every week writing briefs that should take ten minutes.
The system in this guide is the one we actually use at FlowCandy to run email strategy for DTC brands, and it didn't come from a tutorial. It came from building it, breaking it, and figuring out exactly where the API walls are.
If you want help setting this up for your brand or your clients or you're just curious what a fully systemized email program looks like from the inside, we'd love to talk. Book a strategy call with FlowCandy
